
As an Amazon Associate, we earn a small commission from qualifying purchases — at no extra cost to you.
Add a creative twist to your Halloween décor with Spooky Macrame Patterns! You can craft wall hangings, lamps, and other themed accessories.
8 Spooky Macrame Halloween Patterns
1. Halloween Boo Ghost Wall Hanging
Make this spooky-cute Halloween “Boo” Wall Hanging with simple knots and yarn! A fun DIY craft that adds festive charm and a touch of handmade magic to your Halloween decor.
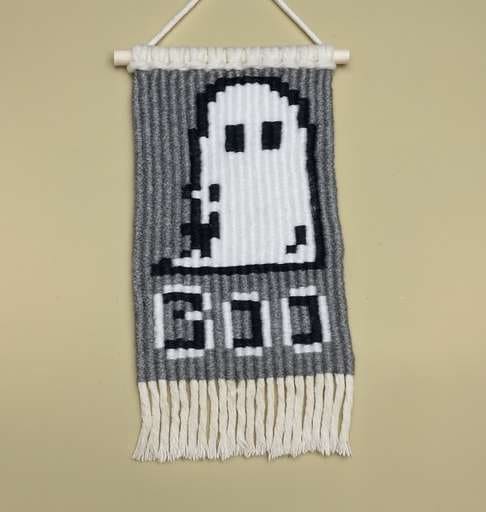
Materials You’ll Need
- 1 – 6 inch (15.24cm) wooden dowel
- 11 – 30 inch (76.2cm) 3.35mm single strand cotton rope
- 1 – ball of Scheepjes yarn in the colour black
- 1 – ball of Scheepjes yarn in the colour dark grey
- 1 – ball of Scheepjes yarn in the colour white
- Measuring tape
- Scissors
Step-by-Step Instructions
Step 1: Prepare the Base
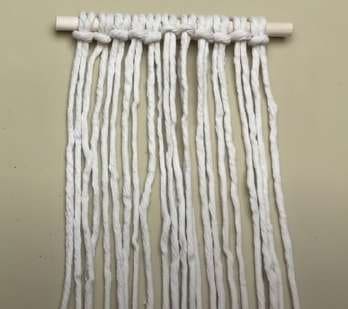
- Take your 6″ wooden dowel.
- Attach 11 cords onto the dowel using Lark’s Head knots.
- Fold the cord in half, loop it over the dowel, and pull the tails through. Repeat until all 11 cords are attached.
Step 2: First Row in Grey
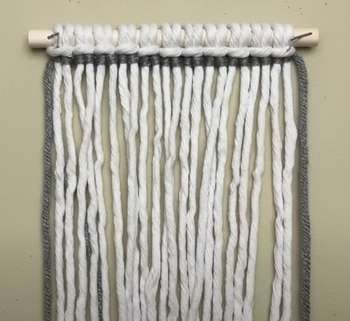
- Cut one grey yarn strand, 120″ long (working cord).
- Attach grey yarn onto the leftmost filler cord using a Vertical Double Half Hitch knot.
- Continue knotting across all cords, moving left to right.
- Return back with another row, this time knotting right to left.
Step 3: Adding Black Yarn
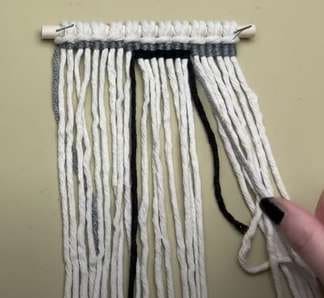
- When you reach the section where the “BOO” design begins, switch yarn colors.
- Attach black yarn to the filler cord using a Vertical Double Half Hitch knot, just like at the start.
- Carry the unused yarn (grey or black) across the back neatly when not in use.
Step 4: Switching Colors Back to Grey
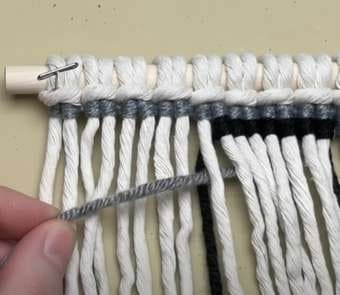
- To switch back, lift the working cords slightly.
- Run the grey yarn behind the cords and place it on top of the black strand.
- Resume tying Vertical Double Half Hitch knots in grey.
Step 5: Continue Pattern
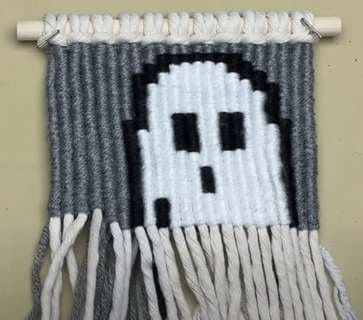
- Repeat the process of alternating grey and black yarn rows until the design is complete.
- Always carry unused strands at the back to keep the front clean.
Step 6: Finishing Touches
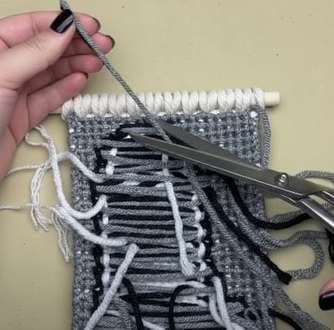
- Flip the wall hanging over to tidy the back. Take loose strands, tie double overhand knots, and trim excess yarn.
- Trim the fringe evenly at the bottom. Recommended: about 2 inches long, but adjust as you like.
- Comb the fringe for a polished look.
2. Macrame Skeleton Keychain
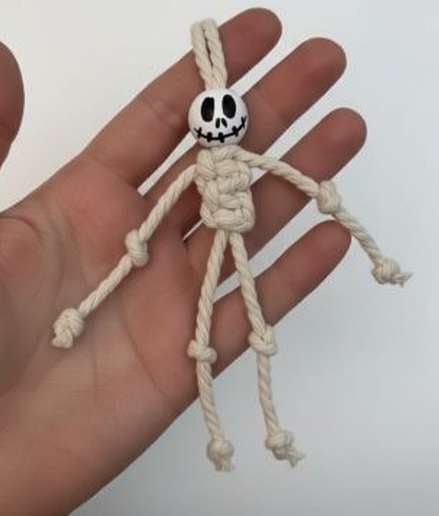
Make a spooky-cute Macrame Skeleton Key chain with just a bead, some cord, and a few simple knots! A quick and fun DIY Halloween craft that’s perfect for key chains, decor, or gifts.
Materials Required
- 2 x 55cm lengths of 3mm macrame cord.
- 20mm wooden beads with a large 4-5mm hole
- Permanent marker – to draw skeleton face (eyes, nose, mouth)
- Scissors
Step-by-Step Instructions
Step 1: Prepare Cords and Thread Bead
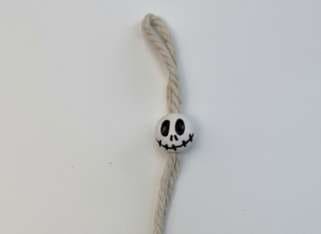
- Cut two lengths of 3 mm macrame cord, each 55 cm.
- Fold one cord in half and bring the ends together, forming a middle loop.
- Thread this loop through the bead.
- To make threading easier, use a thin thread pulled through the bead first, then attach the thick cord loop and pull it through by pulling the thin thread out.
- You should now have a loop of cord through the top of the bead.
Step 2: Making the Skeleton Body with Square Knots
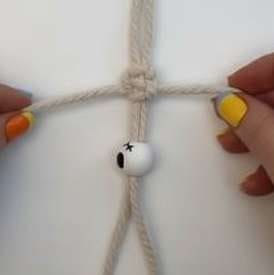
- The arms should come off just below the bead/head. Turn the cords upside down for easier knotting.
- Work square knots downward toward the arms.
- For each knot: place the left cord over the middle, cross the right cord over it, then pass the right cord under the middle and up through the left loop. Pull tight alternate sides for each knot.
- Make about five square knots in total for the skeleton’s body.
Step 3: Turn the Skeleton Right Side Up
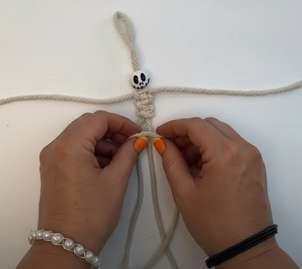
- After completing the square knots, turn the piece right side up.
- The skeleton shape should now be visible.
Step 4:Tie Knots for Arms and Legs (Bones)
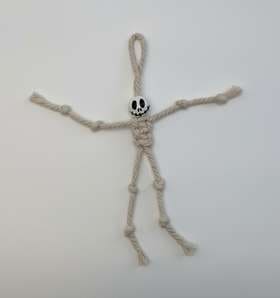
- Tie simple overhand knots on each arm and leg to resemble bones.
- To make an overhand knot, bring the cord around to form a loop, pass the end through, and pull tight.
- Place two knots on each arm and two on each leg, spacing evenly on both sides.
Step 5: Finish and Trim Ends
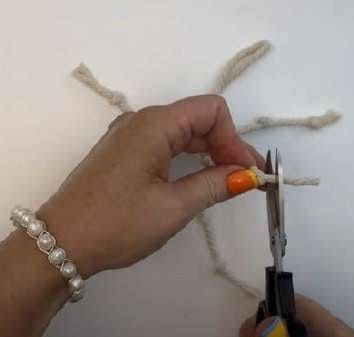
- Once satisfied with the knots, cut the cord ends just outside the last knots for a clean finish.
- Your cute macrame skeleton is now complete
3. DIY Macrame Bat Wall Hanging
Learn how to make a DIY Macrame Bat Wall Hanging with easy step-by-step instructions. This fun Halloween craft uses simple knots, beads, and cord to create a spooky yet cute decoration for your walls.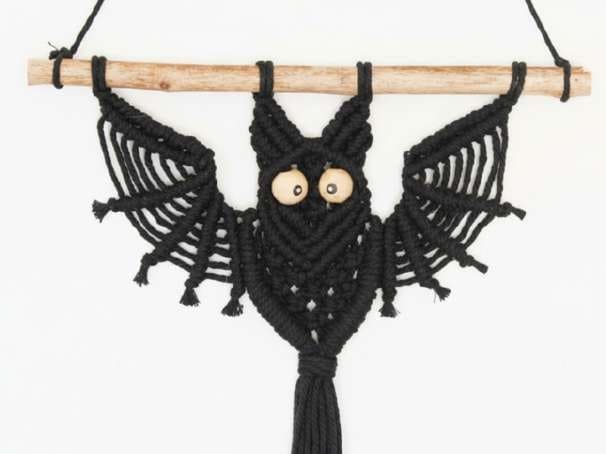
Materials Required
- Black macrame cord – 3mm
- Wooden stick or dowel rod (for hanging)
- 2 wooden beads (or any beads of your choice, red or black also work)
- Scissors
- Measuring tape
- Duct tape (to secure your dowel while knotting)
- Black Sharpie (to color the bead eyes)
- White craft paint + fine paintbrush (to add details to the eyes)
Step-by-Step Instructions
Step 1: Prepare the Base
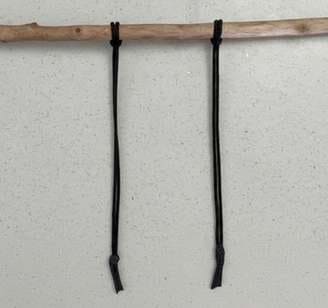
- Secure the stick/dowel to your work surface with duct tape so it doesn’t move.
- Fold two 54″ cords in half and attach them with Lark’s Head Knots about 5 inches apart.
- Make sure the cords hang evenly to keep the bat symmetrical.
Step 2: Start the Bat Ears
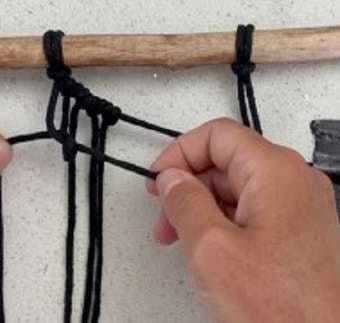
- Take two more cords, fold them in half, and attach them to the right hanging cord with Reversed Lark’s Head Knots.
- Add an extra loop on both sides of the knot to give stability to the ear structure.
- Repeat the same process on the left side to prepare for the second ear.
Step 3: Shape the Bat Ears
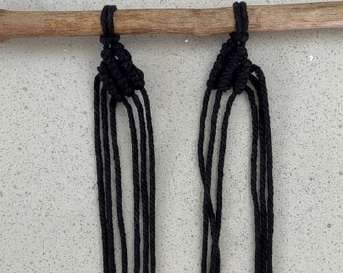
- Use Diagonal Clove Hitch Knots on the first filler cord, looping each working cord twice for strength.
- Create three rows of these knots to form the sharp, pointed ear shape.
- Repeat the process for the second ear so both are symmetrical.
Step 4: Connect the Ears
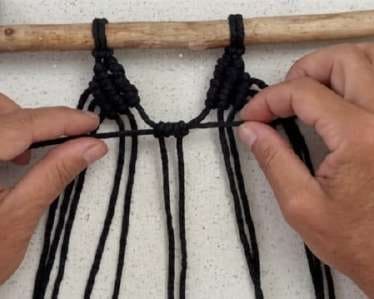
- Cross the two inside strands from the ears.
- Attach one folded cord in between with a reversed Lark’s Head Knot, adding extra loops on both sides.
- Pull tight to connect the ears.
Step 5: Frame the Bat Face
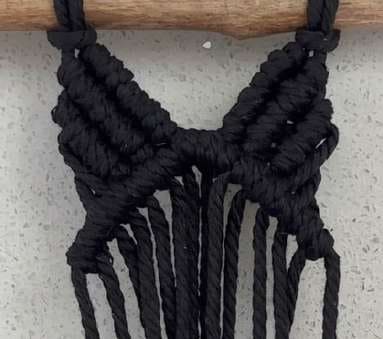
- Starting under the ear connection point, use Diagonal Clove Hitch Knots outward to outline the top half of the face.
- Loop each cord firmly to keep the frame clean and neat.
- Repeat the framing on both sides for balance.
Step 6: Add the Eyes
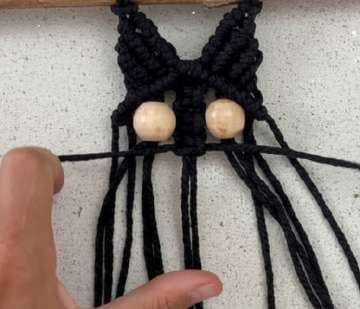
- Take the 4 center cords and tie a one Square Knot.
- Thread one bead onto the two strands next to the knot. Repeat with the other bead for the second eye.
-
Add 2 more Square Knots below the eyes to lengthen the center strand.
Step 7: Shape the Lower Face
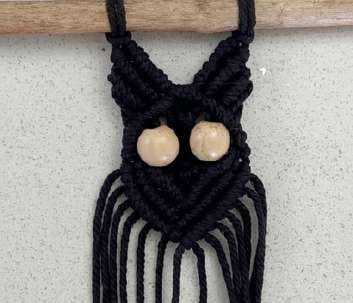
- Use the cords next to the beads as filler cords to start knotting downward.
- Make three rows of Diagonal Clove Hitch Knots from both sides toward the center.
- This forms a rounded, filled-in lower bat face under the eyes.
Step 8: Start the Wings
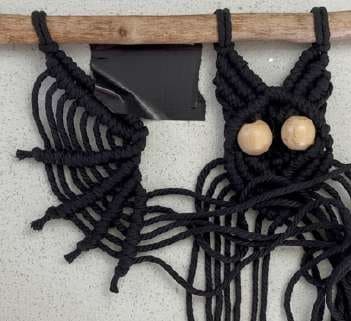
- Attach two folded cords on each side of the head with Lark’s Head Knots then add four more cords per side with reversed Lark’s Head Knots.
- Begin knotting Diagonal Clove Hitch Knots inward, then reverse outward with looser knots to form a V-shape web.
- Repeat to create 4 webs per wing on both sides.
Step 9: Connect Wings to the Head
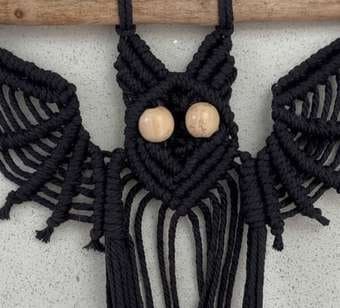
- Start with the outer cord hanging beside the bat face and use it as a filler cord for a Diagonal Clove Hitch Knot.
- Continue gathering cords one by one from the wing, wrapping each new cord over the group to securely attach the wing.
- Repeat the same process on the opposite side so both wings connect firmly to the bat’s upper body.
Step 10: Optional – Enlarge the Body
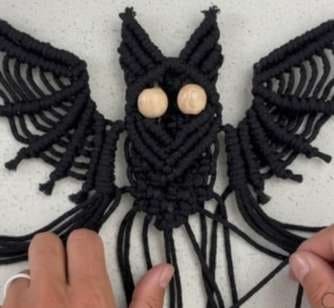
- Knot two rows of off-centered Square Knots starting just under the face.
- Use four outer cords on each side for the first knots, then join the inner cords as you move inward.
- Repeat the process until you meet in the center bottom, creating a fuller body.
Step 11: Finish the Tail
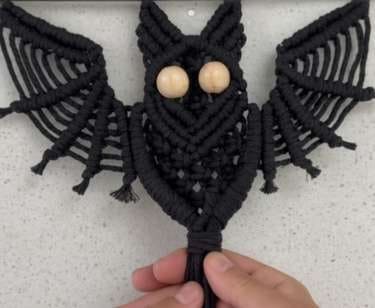
- Gather all the cords hanging at the bottom neatly together.
- Tie them off with a Gathering Knot to secure and create a tassel-like finish.
- Trim the ends — leave them long for a tassel or cut shorter for “bat feet.”
Step 12: Add Details
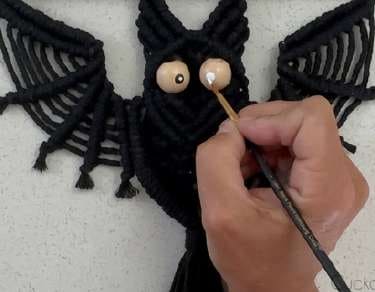
- Use a black Sharpie to draw the pupils on the wooden beads.
- Add small white paint dots with a fine brush for realistic highlights.
- Let the paint dry completely before hanging your bat. Duct tape (to secure your dowel while knotting)
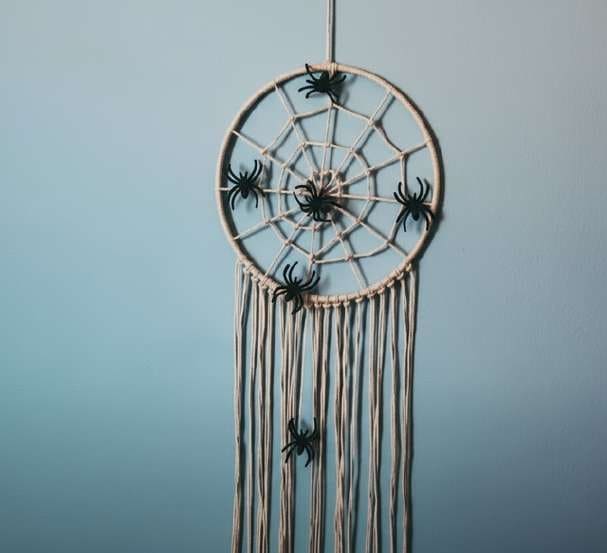
4. DIY Spooky Spider Web Wall Hanging
Make a DIY Spooky Macrame Spider Web Wall Hanging with this easy step-by-step tutorial. Using simple knots, twine, and a hoop, you can create a hauntingly cute Halloween decoration complete with creepy spiders.
Materials Required
- Metal or wooden hoop (base frame)
- 3mm cotton cord
- Butcher’s twine (for the web)
- Plastic spiders (or any spooky decorations)
- Scissors
Step-by-Step Instructions
Step 1: Prepare the Hoop
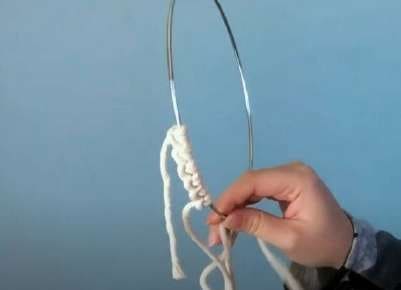
- Cut multiple lengths of 3mm cotton cord.
- Attach the cords around the hoop using Lark’s Head Knots.
- Wrap the entire hoop tightly with these cords in Vertical Lark’s Head Knots to cover the base.
Step 2: Create the Web Frame
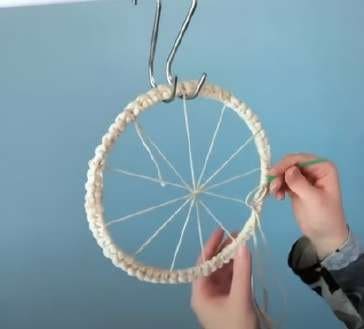
- Take a long piece of butcher’s twine and start crisscrossing it across the hoop.
- Space each cross about five Lark’s Head Knots apart to keep it even.
- Pull the twine taut so the web doesn’t sag.
Step 3: Form the Center Web
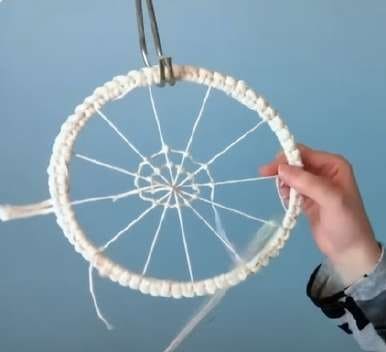
- Tie a new piece of butcher’s twine to the hoop center with a slip knot or overhand knot.
- Knot it around each crossing using Vertical Lark’s Head Knots, moving outward in a spiral.
- Continue until the spiral web shape is formed.
Step 4: Add Dream-catcher Effect
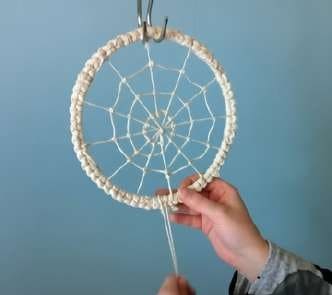
- Cut additional strands of butcher’s twine and attach them to the bottom of the hoop with Lark’s Head Knots.
- Let them hang down to give the design a dream-catcher style finish.
Step 5: Add Halloween Details
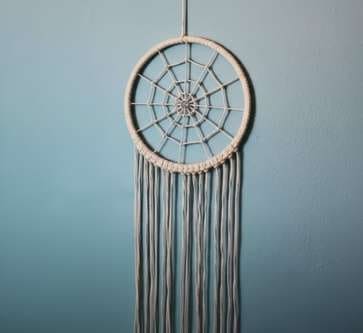
- Once the web is finished, attach plastic spiders or other spooky embellishments.
- Adjust their placement so they sit naturally within the web.
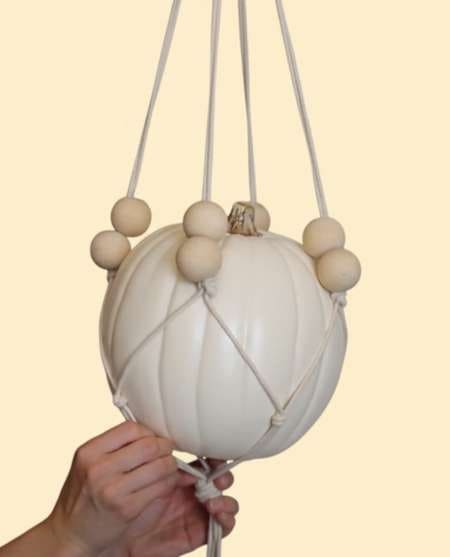
5. DIY Macrame Pumpkin Hanger
Make a DIY Macrame Pumpkin Hanger with this easy step-by-step tutorial. Using simple square knots and a wooden ring, you can create a cozy fall decoration that perfectly holds your pumpkin.
Materials Required
- Wooden ring
- 6 long strands of macrame cord (length depends on size; longer = more detailed design)
- 1 extra short cord (~½ arm’s length) for wrap knot
- Scissors
- Tape (to hold the ring steady while knotting)
- Pumpkin (real or faux, to sit inside the net)
Step-by-Step Instructions
Step 1:- Prepare the Base
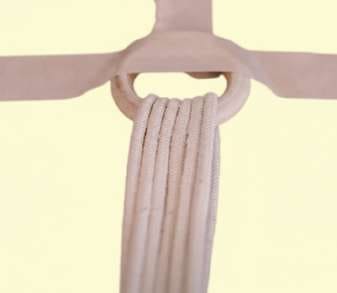
- Cut 6 strands of macrame cord. Feed them evenly through the wooden ring and fold in half, creating 12 working strands.
- Secure the ring to your table with tape or hang it so it stays steady while you work.
Step 2 :- Make a Wrap Knot
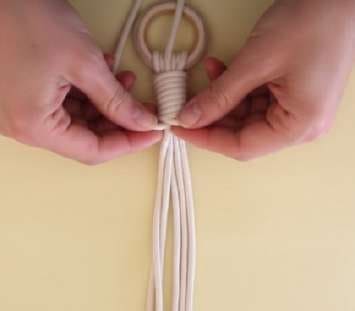
- Take the shorter cord (~½ arm’s length). Form a loop along the 12 hanging strands, then use the long end to wrap tightly around all cords about 15 times.
- Feed the tail through the loop, pull the short top cord to lock it in, and trim off excess.
Step 3:- Start Square Knots
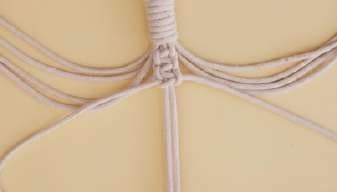
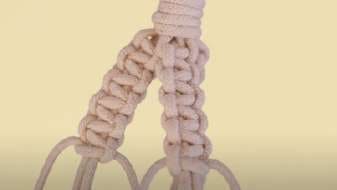
- Divide the 12 cords into 3 groups of 4. In each group, use the 2 outer cords to knot around the 2 center cords, alternating sides each time to form Square Knots.
- Repeat this about 5 times per group to create even bands of knots.
Step 4:- Floating Knot Sections
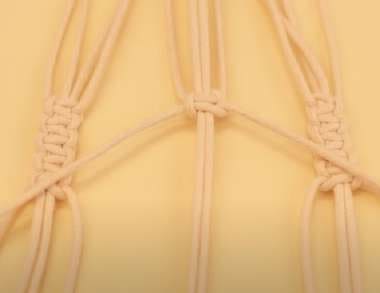
- Slide your knots down the cords to create “floating” knot bands spaced apart.
- Continue knotting further down, about 5 repetitions per section, leaving gaps to form the netted hanger design. Adjust for neatness as you go.
Step 5:- Connect Groups Together
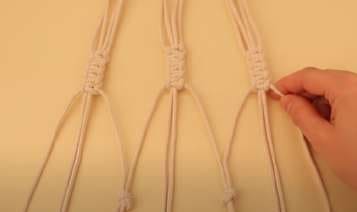

- Take the outer cords of each group and tie them to the nearest group’s outer cords, forming a triangular net.
- This step creates the basket-like structure that will hold the pumpkin. You’ll end up with 3 connecting knots.
Step 6:- Secure the Pumpkin
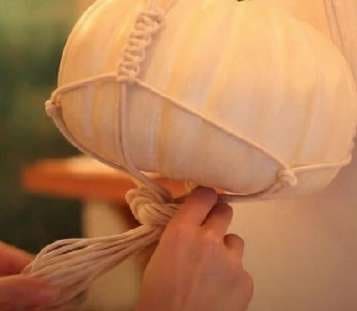
- Place your pumpkin into the macrame net to test the fit. Tie a large knot at the bottom with all cords gathered together to secure it in place. Adjust tension until the pumpkin sits snugly
6. DIY Macrame Ghost
Looking for a fun and spooky craft this Halloween? This DIY macrame ghost is the perfect handmade decoration you can use year after year.
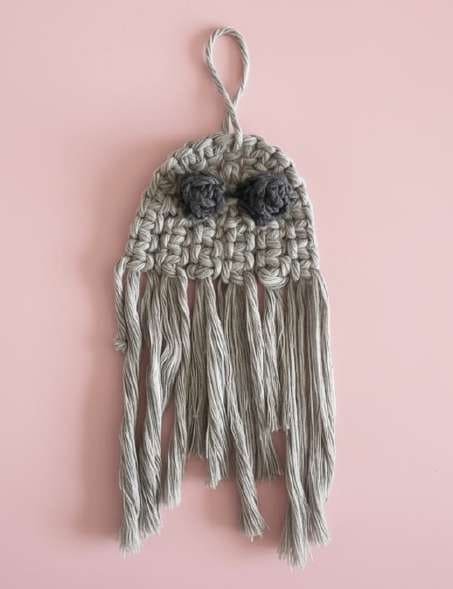
Materials You’ll Need
- 3mm or 5mm macrame cord (choose your preferred thickness)
- Two colors of cord (one for the body, one for the eyes)
- Scissors
- Pins and corkboard (to secure your work)
- Glue gun (or fabric/PVA glue, but hot glue dries faster)
- Pet brush (optional, for fringing)
Step-by-Step Instructions
Step 1: Prepare the Cords
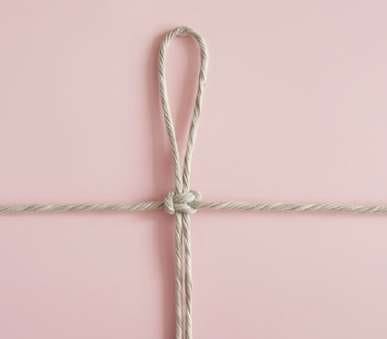
- Cut six lengths of cord (1 meter each) for the ghost’s body.
- Cut two cords (1.5 meters each) for the middle row.
- Cut two cords (2 meters each) for the outer row.
- For the eyes, cut two cords: one 30 cm and one 60 cm, each in a darker color.
Step 2: Start the First Layer (Inner Body)
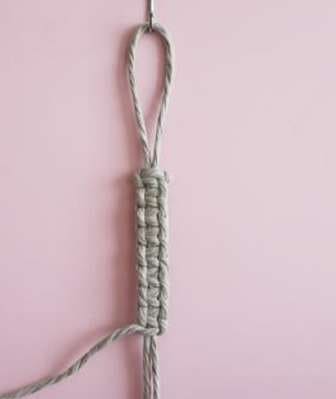
- Fold one cord in half, pin the midpoint, and place another folded cord beneath it, leaving a gap for the fringe.
- Begin tying square knots: left cord makes an “L,” right cord goes over, under the holding cords, and up through the loop—tighten, then repeat from the right side with a “P.”
- Keep alternating until about 8 knots form the ghost’s first inner arch.
Step 3: Make the Middle Layer
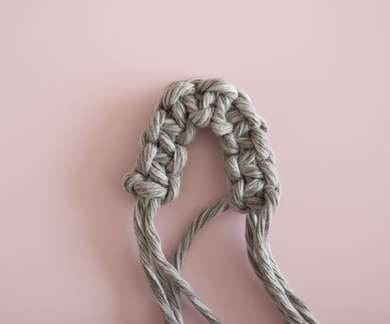
- Take the two 1.5m cords. Fold each to find the midpoint. Pin them down.
- Place one cord underneath the holding cords.
- Tie square knots as before, but make a longer row (about 12 knots) so it can wrap around the first layer.
Step 4: Make the Outer Layer
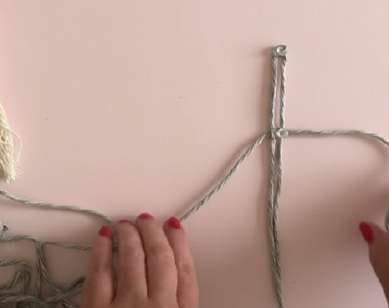
- Use the two longest cords (2m).
- Fold, pin, and repeat the same process to create a third arch.
- Ensure this row fits around the second layer neatly.
Step 5: Assemble the Ghost
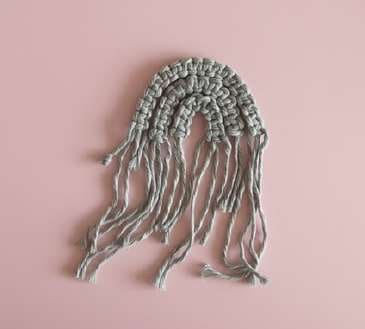
- Lay the three rows together, creating a layered “rainbow” shape.
- Using a glue gun (or fabric glue), carefully attach the layers together.
- Start with the smallest and glue each larger layer around it. Align the bottoms so the fringe hangs evenly.
Step 6: Make the Eyes
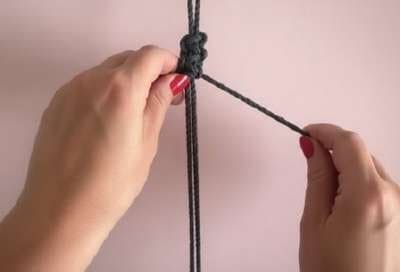
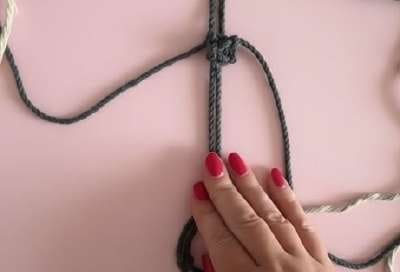
- Take the 30 cm cord as the base and place the 60 cm cord underneath it.
- Tie 2.5 square knots.
- Pull the two holding cords through the loop at the top. This creates a small, rounded berry knot (like a ball).
- Tighten with another half square knot to secure.
- Trim the excess cord. Glue the eyes onto your ghost. You can also use googly eyes, felt, or buttons if you prefer!
Step 7: Add Fringe and Finishing Touches
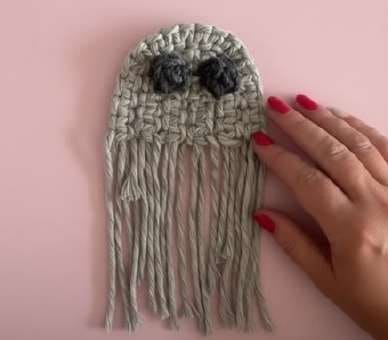
- Brush out the fringe at the bottom with a pet brush for a soft, ghostly effect.
- Trim it straight, angled, or in a “V” shape, depending on the style you like.
- Add a hanging loop: thread a spare piece of cord through the top and tie it securely.
7. Macrame Light Up Ghost Tutorial
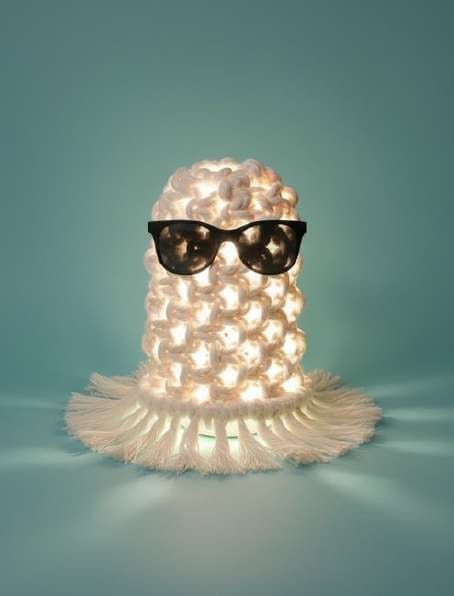
Bring some handmade charm to your Halloween décor with this adorable macramé ghost. It’s beginner-friendly, uses mostly square knots, and works up quickly.
Materials You’ll Need
- Macramé cord (about 3–5 mm thick)
- Scissor
- Pins and corkboard (for stability)
- Felt (for eyes or glasses)
- Hot glue gun (or fabric glue)
- Pet brush (optional, for fringe)
Step-by-Step Instructions
Step 1: Make the Magic Ring
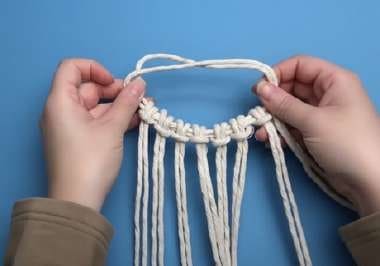
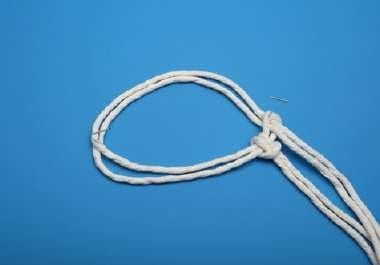
- Take one strand of cord and fold it in half.
- Curve it to form a hoop and thread the tail end through the loop.
- Attach seven more cords to this hoop using a Lark’s Head Knot.
- Pull the base tails tight to cinch it closed
- This creates a macramé version of a magic ring (like in crochet).
Step 2: Start with Square Knots
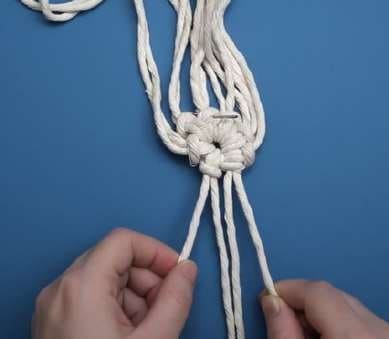
- Using the tail cords and the two next cords, tie your first square knot.
- Grab the next four cords and tie another square knot.
- Continue until you have four square knots in total around the ring.
Step 3: Add More Cords & Continue
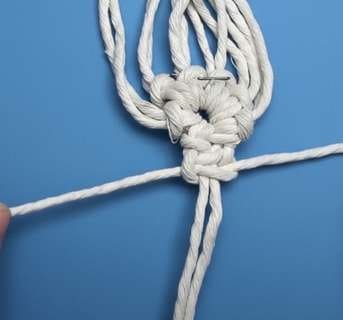
- To join two square knots, fold a new cord in half and place the loop behind the filler cords.
- Tie a square knot as if it were already part of the project.
- Push the knot up neatly to the top.
- Repeat across the round.
- This process builds an alternating square knot pattern.
Step 4: Keep Building the Body
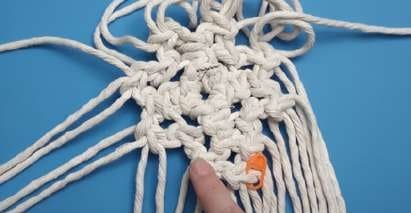
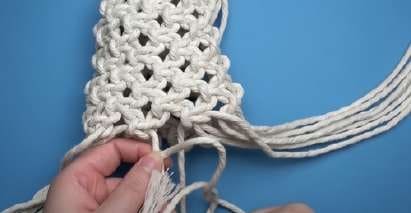
- Continue tying rows of alternating square knots.
- Use a stitch marker or a loose knot to mark where each row starts and ends.
- Work in rounds until you have the desired length.
- About 10 rows give a nice ghost shape, but you can make it taller or shorter.
Step 5: Finish the Base
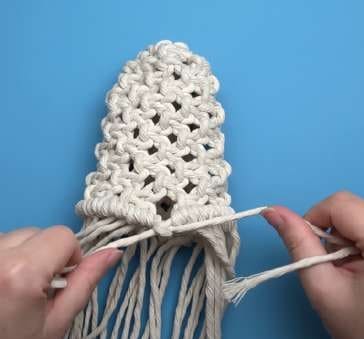
- At the bottom, switch to double half-hitch knots.
- Work all the way around, leaving the tail ends of the filler cords.
- Once you return to the starting point, tie the two long tails together with a double half hitch.
- This creates a small “train” effect at the back of the ghost.
Step 6: Add Fringe
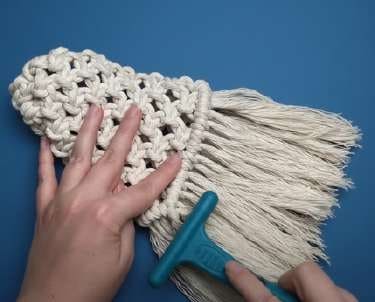
- Trim the bottom cords to your desired length.
- Brush them out with a pet brush for a soft, ghostly effect.
- Shape the fringe straight, angled, or wavy.
Step 7: Add Eyes or Accessories
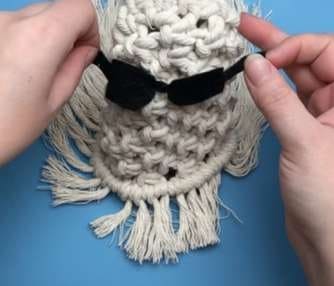
- Cut out circles or fun shapes (like sunglasses) from black felt
- Glue them on with hot glue.
- You can also use googly eyes, embroidery, or buttons for a different look.
- Your macramé ghost is ready! Cute, beginner-friendly, and perfect for Halloween décor. Try making a few in different sizes for a spooky handmade display.
8. Macrame Skull Wall Hanging
Who knew spooky could look this stylish? Learn how to knot your very own Macrame Skull Wall Hanging with this fun, step-by-step Halloween DIY. Creepy, crafty, and a little cheeky – it’s the perfect handmade decor to haunt your walls
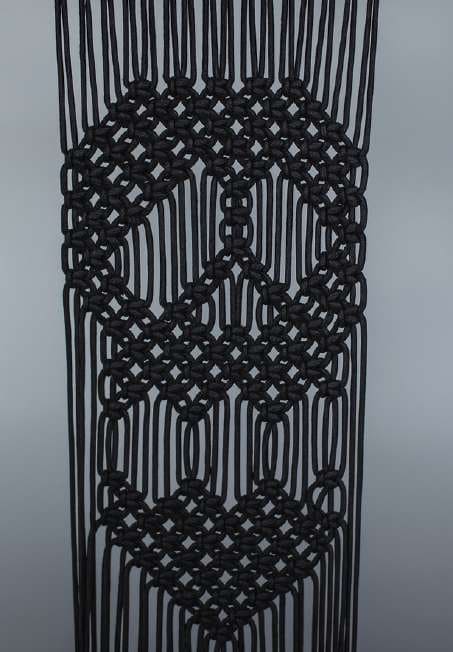
Materials You’ll Need
- Cord: 3 mm single-strand twisted cotton string (black)
- Dowel or driftwood (11 inches long)
Step-by-step Instructions
Step 1: Attach the Base Cords
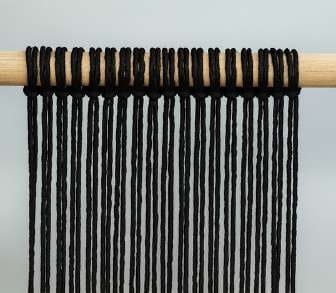
- Cut 18 cords, each 2 meters long.
- Fold in half and attach to a dowel with Lark’s Head Knots. This forms your starting row.
Step 2: Create the Center Knot
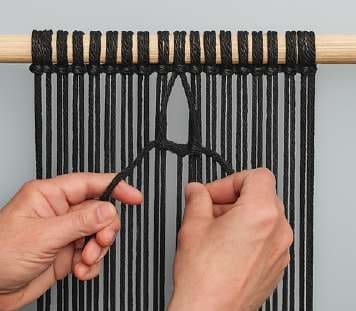
- Tie a square knot in the middle of your work about 1.5 inches down from your Lark’s Head knots.
- Tie two more square knots on the left and 2 more on the right.
Step 3: Build the Upper Rows
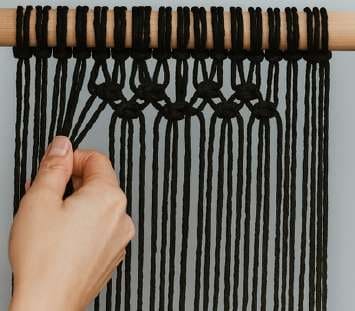
Form three rows below:
- Row 2 → 6 alternating square knots
- Row 3 → 7 alternating square knots
- Row 4 → 8 alternating square knots
- Row 5 → 9 alternating square knots (using all cords)
Step 4: Shape the Cheeks
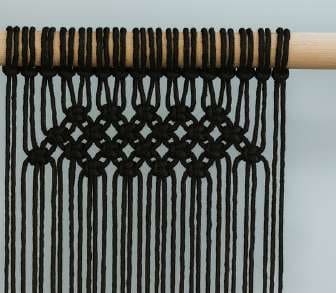
- Skip 2 left cords, tie 2 knots. Skip 4 cords, tie 2 more knots. Repeat once more.
- Tie 2 knots on the left, skip 8 cords and tie 1 knot, then tie 2 knots after skipping 8 more.
Step 5: Form the Eye Sockets
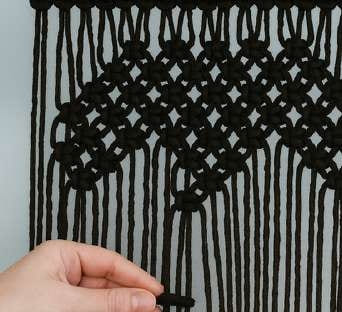
- Skip 2 cords, tie 1 knot. Skip 8 cords, tie 2 knots. Skip 8 cords, tie 1 knot.
- Tie 1 knot, then skip 12 cords to tie 1 in the middle, and another on the right.
Step 6: Fill Below the Eyes
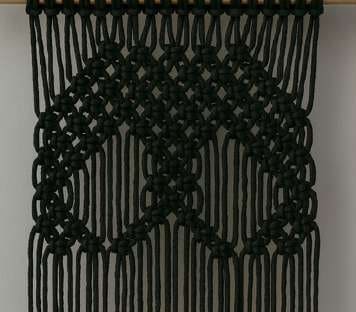
- Repeat pattern: skip 2 cords and tie 1 knot, skip 8 cords and tie 2 knots, skip 8 cords and tie 1 knot, then add 2 more knots.
- Skip 4 cords and tie 1 knot, repeat again, then tie 2 more knots after skipping 4 cords
Step 7: Shape the Jawline
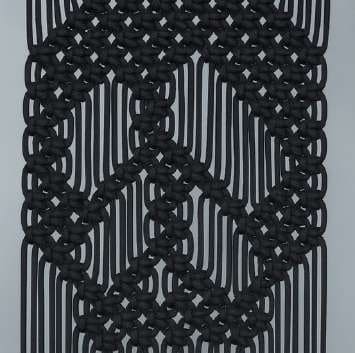
- Skip 2 cords, tie 3 knots. Skip 8 cords, tie 3 knots. Skip 4 cords, tie 7 knots across.
- Skip 6 cords and tie 6 knots. Next row: skip 4 cords, tie 7 knots. Then skip 6 cords, tie 6 knots.
Step 8: Make the Teeth Section and Complete the Bottom Rows
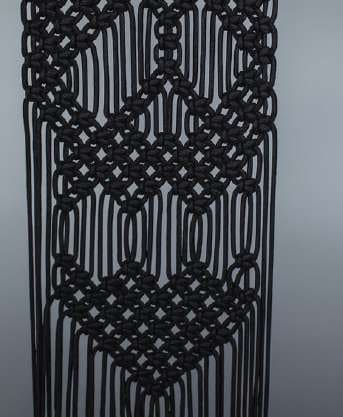
- Skip 4 cords, tie 1 knot, and repeat this sequence three more times for a total of 4 knots.
- Leave about 2 inches of space, then repeat the same row to define the lower edge.
- After that, complete the bottom section with narrowing rows as follows: 6 knots (skip 6 cords), 7 knots (skip 4 cords), 6 knots (skip 6 cords), and for the final row, 5 knots (skip 8 cords).