As an Amazon Associate, we earn a small commission from qualifying purchases — at no extra cost to you.
Learn how to preserve flowers with borax and keep the shape, look, and beauty of your favorite blooms for many years inexpensively!
Besides being famous for a variety of uses, borax is an excellent tool to preserve the shape and feel of your lovely flowers all year round. It’s all possible because of its desiccant activity, which absorbs the moisture of anything that comes in contact with this powdery substance. Later in this article, you’ll learn how to preserve flowers with borax easily without any hassle.
Best Flowers for Drying With Borax
Always opt for small and thin-petalled flowers, as they dry very quickly using the borax method. To cut your hassle, we have collected a list of thin-petalled blooms that preserves well with borax.
- Chrysanthemum
- Daisy
- Hydrangea
- Lilac
- Marigold
- Rose
- Water Lily
- Tulips
- Lavender
How to Preserve Flowers With Borax?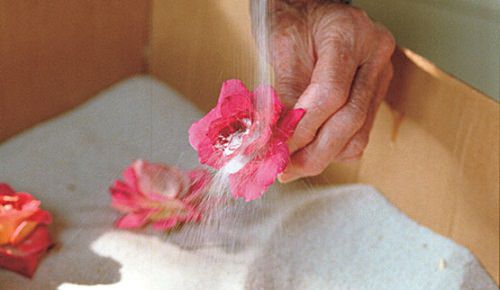
Whether the flowers are from your wedding bouquet or you want to capture their beauty for later, borax is the best and cheapest way to preserve them. Also, drying your favorite spring and summer garden flowers helps you make wreaths, garland, ornaments, and many other crafts all year round.
What You’ll Need
- Borax
- Plain Ground Cornmeal
- Fresh Flowers
- Cardboard Box (Large enough to hold flowers)
- Newspaper
Directions
- Grab fresh flowers and trim any damaged or discolored petals.
- Next, remove all the leaves from the flowers’ stems. (Optional)
- Combine equal parts of borax and plain ground cornmeal.
- Put one inch of the prepared mix evenly at the bottom of the cardboard box lined with newspaper.
- If you’re using flat flowers such as zinnias or daffodils, then trim the stems around one and a half inches long.
- Insert the stems into the bottom layer of the borax mixture and sprinkle the desiccant mixture gently to cover the blooms properly.
- For other flowers, you can use this same method, however, remember to opt for a deeper box, so the thicker blossoms will be coated entirely.
- Now, cover the box with a lid and leave for 2-3 weeks in a warm, dry spot.
- Make sure to inspect the box periodically after about 10 days to check if flowers are dried or not.
- Once they’re dried, remove blooms before they become brittle. Gently brush any clinging borax mixture from the petals using a super soft-bristled brush. Your preserved flowers are ready to display.
Precautions
While drying the flowers with borax, keep the below precautions in mind to avoid any mishaps with you or your beautiful blossoms.
- Keep the container and pack of borax far away from the reach of pets and children.
- Wear a good quality face mask and hand gloves while handling borax.
- While pouring the desiccant mix all over the flowers, protect the petals from any kind of damage and alteration.
- Don’t crowd the box with flowers as it causes uneven drying. Maintain a gap of 1-2 inches between each blossom.
Final Thoughts
After reading the above article, you don’t have to watch your lovely flowers wilt anymore. Simply follow the steps mentioned above and you will have an endless supply of dried blossoms all year round for craft and special occasions.